I searched around for a while but couldn’t find any definitive (and working) MakerBot Thing-O-Matic configurations for my machine with Sailfish Firmware. I decided to go about digging through and setting up my own. My initial reason for doing this was I was having a retraction issue using MakerBot Desktop that, due to it’s non user friendly configuration I just couldn’t get ironed out. I did not have this problem until I updated to MakerBot Desktop 3.5 earlier this week. Prior to that I never had an issue.
Where to get Slicer:
Slic3r can be downloaded from Slic3r’s Website. I downloaded the Latest experimental branch as the stable code is getting a little dated and I wanted some of the visualization features available in the new version. As of this writing version 1.2.6 is the latest code available. It is “experimental” and there are a couple minor stability issues but it does work great so far. After downloading drag it to your Applications folder or install it per Silc3r’s instructions.
Initial configuration:
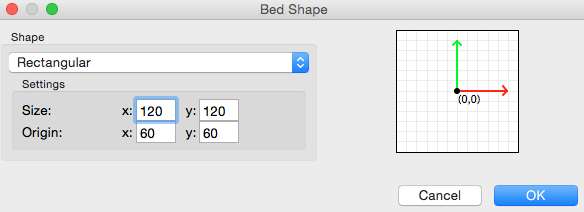
When first setting up there is a “wizard” in the new version. Be sure to read as you go along. When setting your bed size measure what you have and set the origin for the center. Set your nozzle as appropriate. I have a 0.4 mm nozzle.
Set your Gcode flavor to Sailfish (MakerBot) and the number of extruders you have as appropriate. I only have on bone-stock MK-7 extruder which I have had zero problems with for the last 4 years. After setting the platter the Custom Start and End Gcode needs to be modified from the default values to properly home and finish. If this isn’t done it can crash the head or home in the incorrect direction potentially damaging the machine. I grabbed some good G-code I had from MakerBot Desktop and grabbed the working code out of there:
Start G-code
G162 Z F1000 (home Z axes maximum)
G92 X0 Y0 Z5 A0 B0 (set Z to 5 - Tell the printer it's at X0,Y0,Z5)
G1 Z0.0 F1000 (move Z to '0' - This will back the Z off the limit switch by 5mm)
G162 Z F250 (home Z axes maximum - slower feedrate)
G161 X Y F2500 (home XY axis minimum)
M132 X Y Z A B (Recall stored home offsets for XYZAB axis)
G1 X25 Y-60 Z10 F3300.0 (move to waiting position)
M135 T0
M104 T0 S[first_layer_temperature]
M133 T0
End G-code
G1 X0 Y55 F3300
G162 Z F1000(home Z axis maximum)
M104 S0 T0
M18 A B(Turn off A and B steppers)
M18 X Y Z(Turn off steppers after a build)
The start code basically homes the printer then moves it into starting position. The end code moves the print head out of the way, disables the heater and turns off the stepper motors.
How to get X3G Output
To get X3G output, the binary format that MakerBot printers read off the SD cards you must convert the G-code. To accomplish this I am using GPX G-code to X3G Converter posted on Thingiverse by whpthomas. This can be downloaded for OS X and Windows on thingiverse here. You’ll want to put this somewhere you can find it. On my Mac I put the contents it in my Applications Folder as “/Applications/3D Printing/Post Processor”. I opened and edited the gpx.ini file that sets the configuration. You’ll want to set it machine_type as “t7” if you have a Thing-O-Matic with a single MK-7 extruder and set the gcode_flavor to “makerbot”. The configuration file is well documented. I left all other entries unchanged and saved configuration.
After configuring GPX it needs to be defined as a post processor in Slic3r. Click the Print Settings and select Output Options. In the Post Processing scripts enter in the path to the gpx executable. In my case “/Applications/3D Printing/Post Processor/gpx”. Now when G-code is written it will call this and output an X3G file in the same path. Note you can configure gpx to output the X3G to a different path in the gpx.ini file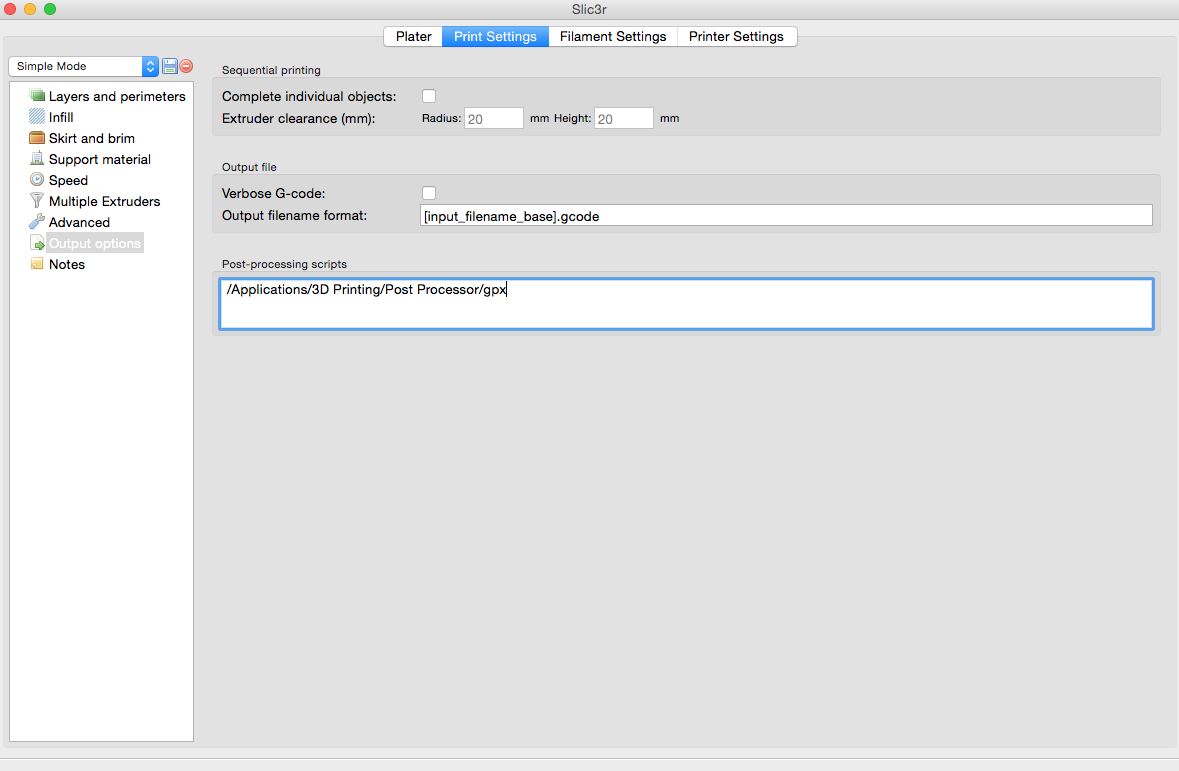
Problems
The print quality out of Slicer is very good and having the configuration options at your finger tips for fill pattern and styles is much Nicer than MakerBot Desktop. However when printing PLA my heated build platform would turn on randomly and start melting the prints. After corresponding with Dan Newman on the Jetty (Sailfish) Google Group he did say that the M126/M127 (open/close valve) G-codes that Slicer inserts for status updates cause the extruder controller to do nasty things sometimes. Knowing this I wrote a simple pre-processor to rip these out of the code before feeding to GPX.
#!/bin/bash -f

pp_path=`dirname "$0"`
export pp_path

egrep -v "M127|M126" $1 > $1.tmp
rm $1
mv $1.tmp $1

"$pp_path/gpx" $1

exit 0
I put this in a script file named gpx_fix in the same directory as gpx and made it executable on the command line (chmod +x px_fix). I then modified my slicer configuration to call this script ‘gpx_fix’ instead of the gpx executable. This removes any M127/M126 commands from the source G-code before passing it onto gpx.
Notes
Updated 02/17/14 – I noted issues with the homing of the printer not offsetting from the bed properly/inconsistently. As such I determined the problem lay in the start G-code and modified it. It was giving an absolute -5.0 Z setting which resulted in the homing to actually moving the platform. Somehow Makerware does this properly when it generates the X3G event hough the homing G-code in the software is incorrect. While it was working with the broken G-code, subsequent prints of the same code resulted in the nozzle being too close or too far from the bed.
I have also linked my full Slic3r configuration file here: Slic3r_ToM_Config.ini