HomeKit serves as a software framework that lets users set up their iPhone to configure, communicate with, and control “smart-home” appliances. By designing rooms, items and actions in the HomeKit service, users can enable automatic actions in the house through a simple voice dictation to Siri or through apps. This is also a closed protocol which also means only registered vendors can have their products certified to work. In addition X10 was a protocol developed in developed in 1975 for home automation. Because it’s been around for a while the devices are somewhat cheaper but this also means that it doesn’t sport a connection to the newest protocols like HomeKit. I experimented with voice control years ago (circa 2000) with HomeSeer but was never satisified with the quality and the fact that I would have to wire microphones all over my house. Now that we have Siri and other fantastic voice recognition and this cool HomeKit integration the future for this old protocol is now.
HARDWARE:
To accomplish my HomeKit – X10 integration the following hardware was used
- RaspberryPi Model B (newer models like the model 3 or Pi Zero should also work) w/ 32 GB SD Card w/ Rasbian
- USB-Serial dongle (or this newer model)
- X10 CM-11A
The X10 CM-11A module is connected to the RasberryPi via the USB-Serial dongle. My CM-11A was purchased around 1999 but still works. It does a pretty good job with my 2500 sq-ft. home with a signal bridge and is even able to control my chicken coop lights located a solid 300′ from the house.
Software:
The HomeKit integration was done in two parts. First an old program that has just seemed to keep working over the years named “heyu”. This application can maintain and upload compiled timers to the CM-11A as well as issue individual commands via the serial connection. I used the latest “stable” version 2.10 source code and compiled it on my RaspberryPi. Once compiled I installed it onto the system and created a configuration file for my system along with some timers. This was done several years ago so I could continue to have my timers setup without having to rely on my retired Windows NT 4.0 notebook running HomeSeer. Once it’s compiled and configured you should be able to issue commands such as “heyu on A6” which will turn on X10 device A6. In my case this is light over my dining room table.
They heyu source code can be downloaded here: Heyu 2.10
Building and installing heyu is easy – just follow these quick instructions below:
% wget https://github.com/HeyuX10Automation/heyu/archive/v2.10.tar.gz
% mv v2.10.tar.gz heyu_v2.10.tar.gz
% gzip -cd heyu_v2.10.tar.gz | tar xvf -
% cd heyu-2.10/
% ./Configure
% make
% sudo make install
After heyu is built and installed you will need to make some quick changes to the configuration file for your particular setup. This can be as simple as defining the serial port it uses to communicate or more advanced defining aliases and timers for upload to the CM-11A. The later isn’t required for the HomeKit integration but you do need to configure the basics in heyu for it to work. The configuration file is stored in /etc/heyu/x10.conf. At a minimum you should check the HOUSECODE and TTY setting. If you are using the timers you may also want to adjust the LATITUDE and LONGITUDE settings. See the heyu README file and man pages for more information. Once you have the basics setup and the CM-11A connected you should be able to issue a command like “heyu on A6” and have it turn on device A6. Once you have basic X10 control working proceed on to get the next piece of the software working.
The second piece of the software is the HomeKit bridge or core device server. This is the software stack that advertises and communicates between the HomeKit clients and the actual devices on the network. For this I found HAP-Node.js which can be found on github. I take no credit for this fine piece of well documented software that is able to advertise “virtual” devices and take actions when events are received. I downloaded and installed this as follows:
# Install Node.js (from: http://weworkweplay.com/play/raspberry-pi-nodejs/)
% wget http://node-arm.herokuapp.com/node_latest_armhf.deb
% sudo dpkg -i node_latest_armhf.deb

# Download and extract the HAP-Node.js code
% wget https://github.com/KhaosT/HAP-NodeJS/archive/master.zip
% unzip master.zip
% cd HAP-NodeJS-master
# Note this may take a little while
% npm install
At this point you have the capability to start a HomeKit “Core” or “Bridge” to advertise several “dummy” devices on the network for HomeKit to find. Start it up in debug mode and see that you can find the “dummy” HomeKit devices advertised. You should see a fan (with on/off and speed), light (with on/off brightness, saturation and hue), motion sensor, temperature sensor, garage door opener, door lock, outlet (with on/off), and a thermostat. Start the default Core device server in debug mode – this will allow us to see some of the queries and data being sent back and forth:
% DEBUG=* node Core.js
After the server is running fire up your iDevice and Click on your “Home” icon. If you haven’t setup any HomeKit enabled devices before it should walk you though. Try adding the Light Switch. It will complain that the device isn’t an Apple certified device but you should be able to add it anyhow. The next screen will try to “scan” for a pin code. Since this isn’t a real physical device we don’t have one to scan. Instead look at the file “accessories/Light_accessory.js” and in the LightController class you will see a field named “pinched:” in the distribution I downloaded this was set to “031-45-154”. This pin code can be manually entered via the option at the bottom of the window. When you enter it it will take some time to pair with the HomeKit device (several seconds to a minute). In this time you may see message such as the following in your window where you started the server:
HAPServer [AA:BB:CC:DD:EE:A1] HAP Request: POST /pair-verify +9ms
HAPServer [AA:BB:CC:DD:EE:A1] Pair verify step 1/2 +98ms
EventedHTTPServer [::ffff:192.168.1.8] HTTP Response is finished +363ms
EventedHTTPServer [::ffff:192.168.1.8] HTTP request: /pair-verify +41ms
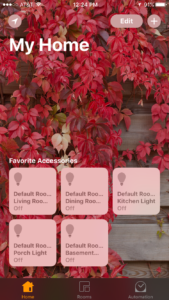
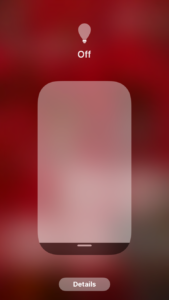
Once the “fake” simple light module is paired you should see it on the main screen of the “Home” app. Go ahead and toggle the state from on to off. Press and hold the icon to bring up the “dimmer” and optionally play with the saturation/hue buttons at the bottom. When you make changes here you should see some log message indicating the state changes. This simple light example is the basis for integrating X10 control. There are a few things we want our X10 bridge “device” to do. First turn on and off and second to support dimming. I copied the Light_accessory.js to Light_A6_accessory.js. I will be modifying this to control my dining room light which is X10 device A6. Several modifications need to be made:
- Unique Name
- Unique HomeKit “mac” address/username
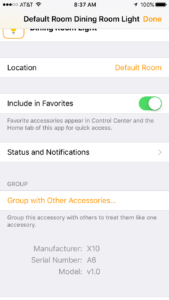
For the unique name I called it “Dining Room Light”. This just makes it easier than having to create “rooms” and then put the devices in rooms. If you want to leverage rooms feel free to modify the device names to simply call it a “Light” or a “Lamp”. Normally this would just be a name like “Philips HUE Lightbulb”. For the “mac” address I stuck with something generic that should just work “AA:BB:CC:DD:EE:<HC>” – where <HC> is my X10 house code. In this example it’s “A6” so my username/mac address would be “AA:BB:CC:DD:EE:A6”. For my serial number I just used my house code. In addition to these items I also made a unique serial number matching my house code and changed the manufacturer to “X10”. The last couple are optional and are displayed in the device info in the iOS app. I did however leverage the serial number in the callback function so I didn’t need to change a bunch of code for each device. I also changed the pin to something easy to remember 000-00-001.
I then modified the callbacks for the device to make system calls to the appropriate heyu commands. I started with getting on and off working then moved on to dimming. Since the dim/brighten commands are relative some additional computation and mapping was done to put it into the proper X10 format. I also disabled the hue and saturation options from my light switch since it doesn’t really support it. Once I was satisfied with this I tested it with the voice controls and it worked brilliantly. After getting one working I added several other X10 controls I had to the mix by duplicating this script to another and substituting “A6” for the other house codes. Find the “Dining Room Light” example here: Light_A6_accessory.js this file can be put into the “accessories” folder. You can now use siri to “Turn on the Dining Room Light”.
Further Modifications
I moved aside the starting “accessories” directory and created a fresh one and then populated it with all the additional “Light_<HC>_accessory.js” files I created and modified. Each one has “A6” substituted with the appropriate house code. When I did this suddenly things stopped working. I believe this was due to some cached/persistent information that was stored on the file system. I killed the server and removed the “persist” directory and had my Phone forget all the sample devices I first configured. This resolved the issues with the status not updating and the devices not working properly.
In addition to this I have added comments in the above script where some additional modifications can be made. This requires heyu to have the state engine running so it can catch the state changes of devices that it can see. I say this because a bunch of my X10 switches are “dumb” and don’t send back their state. If someone toggles the light switch on locally this doen’t get seen my the CM-11A and therefore the heyu engine doesn’t see the state. If you have smarter X10 switches you could in theory skip the engine and directly query the actual switch state and populate this directly into the data.
Once you have your switches working well you can move on and decide ether you want to start this service up every time your Pi boots up. To do this you could modify your /etc/rc.local to start the the service. Mine is setup as follows and generates a log file named /etc/HomeKit/HomeKit.log. It will only start if it’s not already running.
_HOMEKIT=$(ps -ef | grep "/usr/local/bin/node /etc/HomeKit/Core.js" | grep -v grep | wc -l)
if [ $_HOMEKIT -le 0 ]; then
   echo "Starting HomeKit Core Damemon"
   cd /etc/HomeKit && /usr/local/bin/node /etc/HomeKit/Core.js > /etc/HomeKit/HomeKit.log 2>&1 &
fi
Controling it
Here’s a list of Siri phrases that seem to work well to control and query my “dining room light” example. Note that if you ask the “state” of the light it will have the same caveats as above.
- Turn on the dining room light.
- Turn off the dining room light.
- Turn on the dining room light to 50%.
- Is my dining room light on?
- Are any of my lights on?
- Turn off all my lights.
- Turn on all my lights.