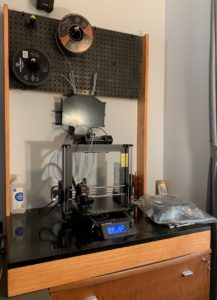
I recently purchased the MMU2s for my Prusa i3 and quickly found my desk was an unruly mess. With the filament buffer and multiple spools there was stuff everywhere. I was determined to clean up this mess so I took to my notebook and after a couple quick measurements sketched out a design that would add some additional under-printer storage as well as manage multiple spools and the buffer. This is the end result.
Design
I sketched out a rough idea of what I wanted in my notebook with some quick measurements and a rough Idea of what I wanted it to hold. Basic specs:
- Uprights/sides 46″ high or less – taller is better at the expense of not being able to reach the spool holders.
- Width of 32″ so it would have adequate space to hold 5+ Spools – also driven by pegboard selection and desk space
- Depth maximum 24″ so it doesn’t overhang off my desk.
- Needed an under-printer drawer or two for tool and additional spool storage
- Cheap/Easy/Quick construction
- Had to blend in with my existing desk and not look like a piece of junk
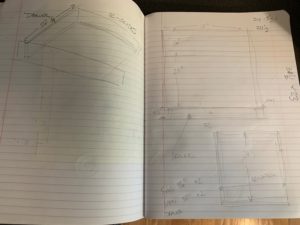
With these requirements in hand I quickly sketched out a drawing and determine how I would put a drawer or two in. Since I wanted cheap as well the drawer count was quickly changed to 1 as additional lumber would be necessary to implement multiple drawers. Ultimately I settled on 1×4 clear pine lumber and underlayment (it’s pretty bad when the underlayment is better than the birch plywood. I then started, based on my sketch put together a cut list so I could purchase wood:
- Upright 2×46″
- Back and Drawer front 2×33 1/2″
- Drawer Sides 2×22 1/4″
- Sides 3x 20 1/2″ (See build notes below) (rip 1/4″ width off of two of them and see notes below for the other)
- Pegboard Mount 2×32″
- Drawer Back 1X 31″
- Drawer Trim 1×33 1/2″ (scrap)
- Top Surface 33 1/2″ x 24″ (1/4″ Underlayment)
- 2X 16″x16″ Interconnecting Pegboard (Everbilt brand)
Build
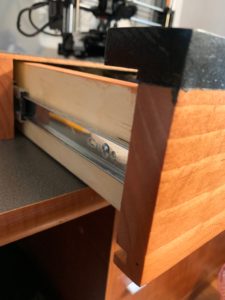
All cuts in this design are straight cuts and can be done with a miter saw (hand or power) with the exception of the drawers and the plywood. The plywood top was cut to “square” on the table saw and notched for the uprights with a jigsaw. The drawer bottom was cut on the table saw and the drawer slides, front and back have a 1/4″ rabbet. I did this on my router table but this could just as easily be done on a table saw. The only other part that was cut on the table saw was one of the drawer sides is ripped down so it rides flush under the plywood top to prevent sagging and to remove 1/4 in from the sides to add some clearance above and below the drawer so it can actually open. Alternatively thicker plywood could have been leveraged and no drawer center would be needed.
For the construction of this I wanted to do something different and have no visible screws. Aesthetics are important so I decided to try pocket holes for the first time and am wondering why I have not tried them sooner. For the pocket holes I purchased a Kreg R3 Pocket Hole System and some appropriately sized pocket hole screws. In this case I used 1-1/4″ Kreg screws with a coarse thread designed for softwoods and plywood. My recommendations with any new tool are to read the manual and practice on some scrap wood. With the pocket hole system I was able to assemble the cut parts of the frame in a very short amount of time.
Drill all your pockets at once following the jig setup guide – there are two at every joint on my build. I assembled the uprights to the pegboard mounts and back first (essentially having a pretty rigid self-supporting frame to attach the side pieces to. I utilized Titebond II wood glue at the joints and fastened with the screws. The plywood top was cut and notched and glued and brad nailed to the top. I used my Freeman Brad Nailer to nail it to the top and filled in the nail holes with Dap Plastic Wood Filler.
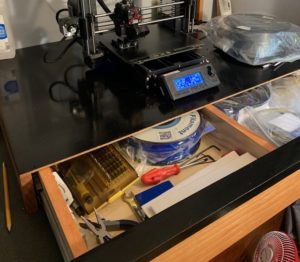
The drawer was constructed separately and the slides mounted in the frame prior to fastening the top onto the project. The drawer bottom is cut such that it will fit snugly in the groves (with a small expansion gap). All the pocket holes for the drawer are internal to the drawers. I used 2x18″ drawer slides.
Finishing:
Once everything was assembled it was sanded smooth and rubbed out with 3M finishing pads. The more time you spend getting it smooth the better any finish will come out. Once it was all clean I finished the entire exterior with Minwax Colonial Maple stain which is pretty close to the color of the faux Cherry on my desk. Every wood takes stain different and always test before committing. I did not pre-treat the wood with the pre-stain wood conditioner and as such the top came out a little blotchy. That and the underlayment isn’t the prettiest wood so I punted and looked for another product to use on the surface that was durable and would cover up the underlayment while still letting a little grain to show through.
To correct this I chose Minwax Polyshades Black finish which I had never used before. I carefully taped off the areas where I didn’t want it to go and re-finished the top and the trim piece on the drawer. I then rubbed it out with the between-coats finishing pads and did another coat. The final coat was finished with a “hassle free” blend of linseed oil (darkens a bit over time), wipe-on Minwax Polyurathane and Mineral Spirits. This finish is super easy to do – but requires several coats to build it up as thick as a pure poly. It also worked well going right over the top surface again. When finished the final coat was rubbed out with 3M Final Finishing pads and polished with a bee’s wax/coconut oil blend.
Making:
After I designed some spool holders and a buffer mount. The design files for these can be found here:
These click firmly into the pegboard and have already been tested with scores of hours of printing.